Accessible Kitchen Prep Area
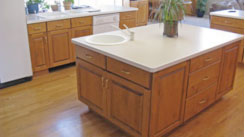
A great meal normally starts in the Prep Area of the accessible kitchen. The hub of the Prep Area is the island where most of the chopping, slicing, dicing, rolling, mixing, peeling, pounding, rinsing, measuring, and other food preparation tasks take place. Although not necessarily an accessibility feature we lowered the height of the island to 34" from the traditional countertop height of 36". This makes it a little easier for both my wife, who is short, and me to work at the island.
The island is located close to the refrigerator where many of the raw ingredients are kept. This is great for me since I can take items from the refrigerator and place them on the island without moving my wheelchair. The Prep Area has the following accessibility features:
Prep Area Pull-Out Cutting Board
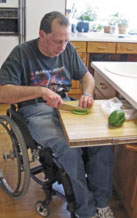 In order to simplify many prep tasks we have a pull-out cutting board at the end of the island. The false drawer front tilts open and the cutting board slides out into the locked open position, ready for use. The height of the cutting board is just high enough (~28") for me to roll under it, but low enough that I can get pretty good leverage on the preparation tool I'm using.
Prep Area Prep Sink
On the same end of the island as the pull-out cutting board is a round prep sink with a garbage disposal. When I'm working at the cutting board it is easy for me to turn to my left to use the prep sink.Since the prep sink has a garbage disposal it is a convenient place to discard of some of the food scraps from the preparation process.
Prep Area Pull-Out Faucet
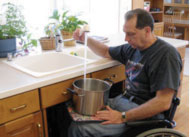 Although not part of the island, the pull-out faucet we have on the main kitchen sink is an important accessibility feature in the prep area. It allows me to fill a large pot on my lap with water. This eliminates the need to lift a heavy filled pot up and out of the sink.
The pull-out faucet is also handy when rinsing large pots and pans or cookie sheets in the sink.
Other Prep Area Ideas and/or Improvements
After using this accessible kitchen for more than 10 years I have a few improvements to suggest. Many of them I incorporated in the new house I'm designing.Cutting Board Improvements
I have increased the size of the cutting board so it extends out of the island an additional few inches and is also a few inches wider.The new design also allows the back few inches of the cutting board to remain inside the cabinet when it is locked open. The new cabinet is designed to accommodate a trash container placed inside the cabinet below the cutting board. The combination of these two changes will allow me to slide food waste to the rear of the cutting board until it falls over the edge and into the trash container. This will make it simple to keep the cutting board free of debris.
Mixer Cabinet
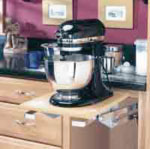
We have a KitchenAid stand mixer that weighs about 30 pounds. Right now we keep it on the bottom shelf of our pantry. It is difficult for either my wife or me to move the mixer from the pantry to the island where we normally use it. Consequently, we don???t use it as often.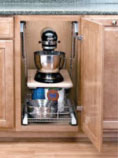 In our new island I have included a mixer cabinet to accommodate this beast of a mixer. The mixer sits on a movable shelf inside a regular base cabinet as shown in the adjacent picture. There is also room for a shelf under the mixer to hold attachments or supplies.
When ready to use the mixer you simply open the cabinet door and give the mixer shelf an easy pull. The heavy-duty lift mechanism gracefully raises the mixer to countertop level, plugged in and ready to use. When finished, gently pull on the release levers and the lifting/lowering mechanism smoothly returns the mixer into the cabinet.
 This appliance lift
Appliance Garage
 There are several good reasons for having an appliance garage in a kitchen. From an aesthetic perspective they help keep the kitchen looking tidy by reducing the clutter. They also help to keep the appliances from getting dusty. I believe the quick and easy access they provide to a variety of appliances is the greatest benefit of these garages. That is why I have added two, 3'-wide, appliance garages to the Prep Area of my new accessible kitchen.
 I currently don't have an appliance garage in my kitchen. This means in order to use an appliance, such as a food processor or blender, I need to retrieve the appliance from a cabinet, move it to a counter, plug it in, and then turn it on. For someone in a wheelchair this takes a bit of time. With the appliance garages I'll simply open the garage door, slide out the appliance, and turn it on.
 Appliance garages can be placed in a corner (See above) or in a straight section of counter. There are numerous types of doors including: tambour, bi-fold, swing out and pop-up doors (See right). I plan to use the pop-up doors in my new kitchen since they don't get in the way of things on the countertop like swing out or bi-fold doors. And tambour doors often tend to stick as they get older. I'm looking forward to the added convenience the appliance garages will provide.
 Like This Article? Then Please Share It
Digg It | Save to del.icio.us | Stumble It | Reddit It |Or subscribe to the RSS Feed of our Content
when new pages are added
